For my first outdoor scene I wanted to create a mountain range similar to one you’d find in the Swiss Alps. I live in Switzerland and went hiking quite often, so that’s what I wanted to recreate. Below you see the final image of a mountain range that shows cliffs mixed with plateaus and space for a mountain lake in the middle.

What makes the Swiss Alps distinct from other mountain ranges for me is that very steep cliffs mixed with grass lands are very common. Below is an example image that shows what I mean (Source: Jorge Cancela on Flickr, CC BY 2.0).

The problem I was facing with Gaea was that cliffs never stayed sharp enough after I’ve applied the erosion node. I also had trouble getting this kind of staircase look. However, after messing around with different nodes I think I’ve found a way to get something close enough.
This post goes through the nodes and settings needed to achieve this. I’m using the professional Gaea 1.2.1.8 version.
Concept and Node Setup
Below is the node setup. I’ll refer to it many times during this section.

Mountain
I wanted to create an environment with a mountain range that wraps a lake. Therefore, I needed a starting mountain that already has some kind of lake in the middle.

Often times other tutorials start with any kind of mountain and then erode it into the specific shape they want. I didn’t want to go this route, because I found it hard to stay in control of what’s actually happening. Like, why have all this detail in place when you’ll get rid of it anyway again. That’s why I switched the Style to Smooth so I just get the shape of the mountain without any details.
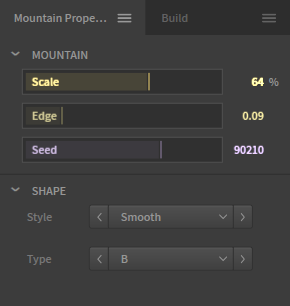
I’ve also scaled the mountain with the Scale slider and also with the Raise function further below this panel (not shown in the screenshot).
This made for a nice start which just provides the shape, so a lot more noise and variation will be necessary in the next steps to make it look more natural.
Fold
I really like the fold node because it’s something that happens all the time in nature. The fold node adds folding of different sediments and makes it look like the mountain is made up of different layers.

That said, a lot of the folding is actually broken up in the next node. Still, I think it adds a nice detail and we can’t place this node any further in the chain because otherwise it’d break up the mountain too much.
I left all the settings default and just played with the seed a bit.
Warp
This is the node that did it all for me. This node adds cliffs but not just in one place but all over the place and still leaves plateaus here and there giving it the look i was trying to create.

Note all the different plateaus as we go from the top of the mountain down. Also, there are now multiple places where we could create a lake.
The Warp Source setting is where the magic happens. I set this to Voronoi S.

You can then use Size, Pertubation, Roughness and Iterations to control how many plateaus you want and also how much noise you want to add. Adding noise / roughness in this step was important because we’ll add some erosion later on, but will only apply it very very lightly. This is because erosion has the tendency to melt your shapes like cheese and we don’t want that.
Thermal
Like I mentioned in the previous section, I wasn’t able to add much erosion. However, I still needed to smooth out the landscape so the flatter parts / plateaus looked like there was grass growing. Furthermore, it’s better if the parts were somebody could walk are smoother for potential use in video games - so the character doesn’t get stuck all the time. The Thermal node helped perfectly here.
The Thermal node seems to work a bit like you’re pouring sand onto the landscape until the flattest and smallest bumps are filled up. This creates a nice and smooth plane between the cliffs and makes the whole environment look a bit more earth-like and less like a meteor.

I’ve dialed down the Duration a bit but apart from that almost everything else is on default.
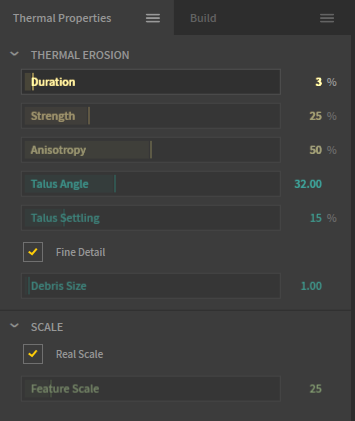
The really nice thing about the Thermal node is that it doesn’t touch sharp cliffs and other details of the landscape at all.
Erosion
I’m really not a big fan of the Erosion node. That may be because it’s not suited for this type of mountain or because I lack experience - I don’t know what it is. What I was struggling with is that whenever I applied it, it melted my sharp cliffs and features like cheese. It made everything look soft and round. It also removed and shifted whole cliffs around, which wasn’t what I intended it to do. All I wanted was to add a little more realism by adding some cracks or some sediment movement.
In the end I was able to trim the Erosion node so I get just a little erosion while still keeping most of the sharp cliffs and other features.

There are two very important changes I had to make in the settings. First, I had to turn off Aggressive Mode. Second, I set the Rock Softness to the lowest value possible. This ensures that steep cliffs are only eroded to the minimal amount.

I think the Erosion node added some value, but I’m still not 100% satisfied.
Hydro
I should have stopped at the Erosion node. However, I wanted to place a lake in the middle of that valley. So, I thought it’d look more natural if the bottom of the lake is more eroded and smoother. The Hydro node together with the mask does exactly this.

However, in the Unreal Engine scene, I decided to make a smaller lake and completely forgot that I applied hydro already. So, the landscape ended up looking a bit too smooth (e.g. the cliff).
Conclusion
With this node setup and settings, I am pretty satisfied how the landscape turned out. I haven’t tested what results I get when I used a different seed for the starting mountain, so your mileage may vary.
I’m always happy to get feedback. I can also provide more details if it helps somebody.